Filters are rules that you define to allow or block a subset of data payloads that you receive asynchronously from one of your connections. You can create filters for specific data models or FHIR® resources.
Let’s explain this with an everyday analogy: you need only a sip of water to quench your thirst, but someone offers you a drink from a fire hydrant. The hydrant opens and you're overwhelmed by the jet of water coming in your direction. Basically, it's too much water and pressure for what you need.
Being connected to a massive healthcare organization with tens of thousands of incoming payloads per day might feel a bit like drinking from that fire hydrant. Our filters help to "turn down the pressure" to reduce that high-volume data stream to the specific dataset you need.
Let's say you're only interested in a subset of patients from a healthcare organization, like the cardiology unit. You could create a filter that would accept all incoming payloads for patients seen only in the cardiology unit and block the rest. But without the filter, you'd receive all the data payloads from every unit, leaving you to decide which to keep after processing them yourself.
Before you get too excited, one filter can't apply universally to every subscription. Instead, you must define filters for each subscription you want to filter. Conversely, you may only have one filter per subscription (though one filter can have multiple rules).
For example, if you only want to receive orders with specific codes from Baylor Hospital (using the Order.New data model), you must create a filter for those specific codes. But to filter orders from UT-Southwestern the same way, you must create a separate filter with those same codes.
To recap, filters are specific to one asynchronous subscription. Because remember, you want to control the water coming out of that fire hydrant, not try to put that water back in.
We've primarily focused on filters for polling type of traffic via the Data Model API. But we now support filters for FHIR® notifications, too.
Filters work the same for either API, but there are two different modes for defining FHIR® filters. We dig into the differences in our how-to article, so check out how to define and edit filters for specifics.
Now that you understand the why and how of a filter, let’s get into the details of what. A filter can have one of two rules: Send if or Block all.
You can define one Block all rule or multiple Send if rules per filter.
There are two subcategories to Send if rules: is in or is not in.
- is in means that the property value must be equal to a value in the value set that you define.
- is not in means that the property value must not be equal to a value in the value set that you define.
When you enter a value set, you can do so in a comma-delimited format. Trailing or leading spaces are ignored, unless you add them within quotation marks. If a value has a comma within it, you must use quotation marks to distinguish it from the other values.
Using the order code example above, you could specify that the order code is in the value set 100,200,300. But if one of the codes is 10,000, you'd use quotation marks like this: 100,”10,000”,200,300.
Some fields are arrays, meaning a request may have multiple values for that one field. These fields have brackets ([]) in the title. In this case, if any value within the array meets the filter rule, then the filter applies.
Let’s say you create the following example filter:
Send if $.Animal.Type[*] is in (walrus).
Then an incoming payload contains this:
$.Animal.Type[*] = [badger,rabbit,walrus,penguin].
Since (walrus) is one of the values in the array, you receive the data payload that has this field value.
Now let’s say you have the same filter rule, but you specify is not in instead. In this case, you wouldn't receive this data payload because (walrus) appears in this payload.
Block all restricts any requests with this data model or resource until the filter is removed. Blocking is helpful when preparing for a new integration that's not ready for go-live just yet.
After successfully defining and saving a filter, all the filter rules immediately apply to the related subscription.
On the Logs page of the dashboard, any filtered logs have the status of Filtered.

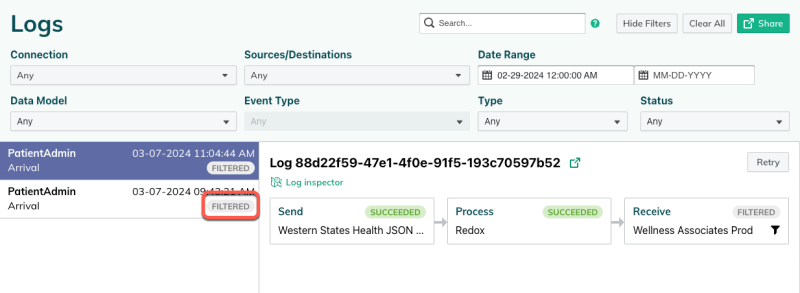
Selecting the log opens the processing stages, which have a Filtered label and icon if a filter was applied. You can select the processing stage to view the log details, then click the filter label to see the specific filter details. These details include the status of the log and the outcome of each filter rule.
Learn about filter outcomes in a log.