Authenticating your system with an OAuth API key is our recommended auth method. If you haven’t already, check out our authentication overview.
Let's start with the high-level steps:
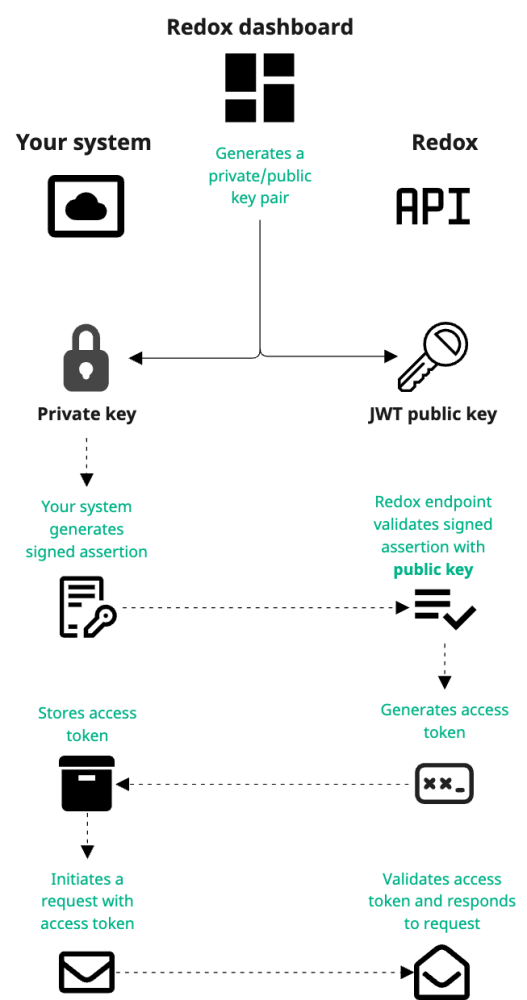
- Provide your own or generate a public key with Redox.
- Request an access token from Redox with an auth request.
- Store the access token in your own system.
- Initiate any API request with the access token in the header.
Check out the diagram for a visual version of these steps:

Now let's get into the nitty gritty for each step.
First, you have to have an API key with a private/public key pair. You can provide one or you can generate one in the Redox dashboard.
- Log in to the dashboard.
- From the navigation menu, select the Developer page.
- By default, the Sources tab opens and displays any configured sources and OAuth API keys. Click the New OAuth API key button. If you want to configure an existing OAuth API key, click the Edit button next to it. Then skip to step 5.User-level API keys
- A modal opens with the API key details. In the Name field, enter the API key name.Best practice for OAuth API keys and multi-region organizations
- Click the Add button.
![Create an OAuth API key]()
Create an OAuth API key - By default, the Settings page of the newly created API key displays with the details. The Name field displays the API key name you entered previously. The client ID field shows the automatically generated ID for the API key. Copy and store the client ID to use when retrieving an access token.
- Choose one of the following options for your key pair:


Next, you must request an access token with an auth request. There are two options for this:
- Use our Postman collection; or
- Use an application of your choice.
Either way, the authentication steps are the same. If you choose to use Postman, complete the prep steps. Otherwise, skip to the authentication steps.
For Postman, there's a little bit of setup to do before running the authentication requests.
- From the Settings tab of the API key, click the DevTools (Postman) tab.
- The Postman options display. Click the Download Postman collection button.
- Run the authentication collection in Postman and select the option for how you want to run it: Postman for Web or Postman for Mac.
- Postman opens and automatically imports the Redox Platform Authentication collection. You can use this collection for authenticating requests sent via the Redox FHIR® API or the Data Model API.
- If you haven't already downloaded the Postman environment when you were generating keys, click the Download Postman environment button from the DevTools tab.Note about the private key
- In Postman, click the Environments tab.
- Click the Import button.
- From the file explorer, select the Postman environment that you just downloaded.
- The Postman environment is added. Select the environment name in the left-hand pane or in the Environment drop-down.
- If the private key variable is still empty, enter the private key that you generated previously.JWKS URL
Now that Postman is ready, you can proceed to the auth request steps.
- Generate a signed request in your system using your private key.
- Send an auth request with the signed assertion to https://api.redoxengine.com/v2/auth/token via HTTP POST from your system. Check out the Header and parameter definitions below these steps for explanations of the header and parameter values.Canada URL
- With Postman, the authentication request looks something like this:Example: Auth request for OAuth (cURL)bash
- With your own application, the request may look like this:Example: Auth request for OAuth (JavaScript)javascriptCopy the code example above and make sure the axios and jose libraries are installed with npm i axios jose. Then, update the privateKeyPEM, clientId, and kid based on the signed request you generated in step 1.Example: Auth request for OAuth (python)python
- Redox validates the signature in the request using your public key, then sends back a response with the access token.
- Use the returned access token to make an API request to Redox.Expiration for access token
In case you're interested in the definitions and expected values for header and parameters in the auth request code examples, check out the tables below. You can also view an example of a valid JWT with all of these values populated.
Now you're ready to initiate API requests with the access token in the Authorization HTTP header using the Bearer authentication scheme like this: