Filters can be useful for async traffic that you receive. You can apply filters to either data models or FHIR® notifications. Learn about filters.
This article contains instructions for defining or editing a filter in the Redox dashboard. If you'd like to create and manage filters via API instead, use the Platform API filter endpoints.
Why can't I see filters?
Only for engineer or implementer roles
- Log in to the dashboard.
- From the navigation menu, click the Connections page.
- All of your connections display on the page. Select the connection that you want to define a filter for.
- The Subscriptions page opens by default for the connection you selected. On this page, find the data model or FHIR® notification that you want to filter. Remember, it has to be one that you RECEIVE. Click the Settings link.
- The Settings page opens. Click the Define filter button.
![Open the subscription settings]()
Open the subscription settings - Follow the next set of instructions based on the type of filter you want to create.


It may be useful to block traffic for a particular subscription during the implementation phase.
- From the Filter mode drop-down, select the Block all option.
- Click the Save Filter button.
![Create a block all filter rule]()
Create a block all filter rule - Your new filter is saved and all traffic for the selected subscription will be restricted until the filter is removed.Filter details in logs


These are the most common type of filters, which allow you to moderate the async traffic that you receive from one of your connections.
- From the Filter mode drop-down, select the Send if option.
- A set of three fields appears. Click the Select Field Path drop-down to view a list of fields.
- Select the field you want to filter.
- A dialog opens for testing the field path and value. You can change your selection by clicking the Field Path drop-down again to view a list of fields.
![Select a field path]()
Select a field path Advanced editing for FHIR filters - Once you have the correct path, use the validation tools to test your choice. Or, if you don't want to test, you can skip and proceed to the next step.
- Find a log payload for the subscription you want to filter. Learn more about searching for logs.
![Copy a log payload]()
Copy a log payload - Copy and paste the log payload into the Test Message section.
![Paste a log payload to test the field values]()
Paste a log payload to test the field values - On the right side of the dialog, under Field Values, the value that displays is the one found at the field path you selected. For a FHIR® filter, you have the option to toggle between Field Values and Output Paths to test that you have both correct. The value tells you what value would be filtered, and the path tells you the location in the FHIR® payload.
![Toggle between field values and output paths]()
Toggle between field values and output paths
- Keep in mind that Redox doesn't validate the filter like this. But it does give you an idea of whether you selected the right field path by using an existing log payload.
- Click the Select Path button on the bottom right of the dialog.
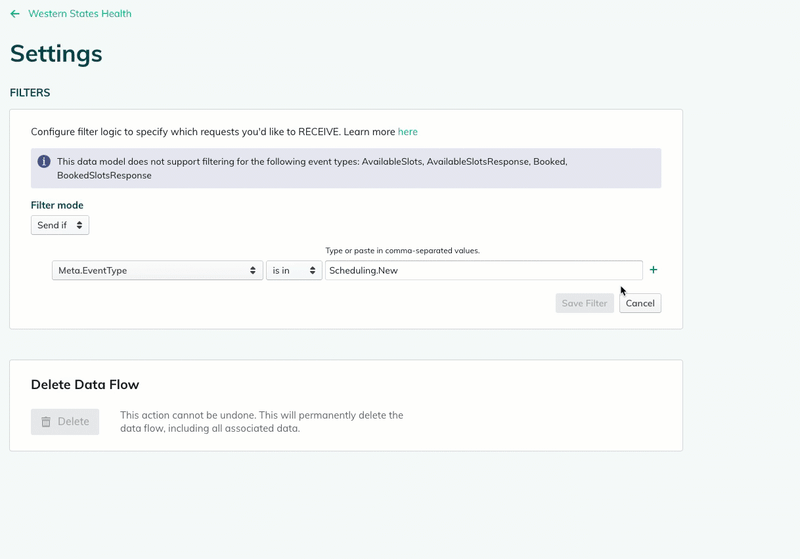
- The dialog closes. In the next drop-down, select is in or is not in. Remember that is in means the field path value must equal something in the defined value set. On the other hand, is not in means that the field path value must not equal any of the defined value set.
- Enter the relevant comma-separated values.
![Define and save a filter]()
Define and save a filter Filters for data model event types - To add a rule for another field, click the plus (+) icon. Populate the fields for the new rule.
- Once you've finished defining all the necessary rules, click the Save Filter button. Alternatively, you can click the Cancel button to discard the filter.
![Add or delete filter rules]()
Add or delete filter rules Filter details in logs


- Follow the steps to open the settings of a subscription.
- Click the Edit button next to an existing filter.
- Modify the existing rule or click the plus (+) icon to add a new rule.
- To delete a rule, click the minus (-) icon.
Previous filter rule settings