
The Monitoring page in the Redox dashboard allows you to view and manage your traffic alert rules. Learn about monitoring data exchange health.
- All environment users can view traffic alert rules. However, a user must be assigned to an engineer or a support role to manage alert rules. Learn about user roles.
- You must have a paid Redox account to use alert rules. If you have a free Redox account, alert rules won’t be visible in the dashboard or available via API.
Review the types of alert rules and the purpose of links before you start creating.
There are different traffic alert rule types that watch for different scenarios in your data exchange. You can create one or more types based on your unique needs.
You must link an alert rule to a subscription to actively watch for the rule’s defined conditions. If the conditions are met, you receive a notification. That way, you can preemptively monitor the health of your subscriptions.
An alert rule can be linked to multiple subscriptions. You can pause or delete a link at any time.
If an alert rule isn’t linked, it’s not actively monitoring anything. You can see if an alert rule has any subscription links on the Monitoring > Alert rules tab of the dashboard.

- Log in to the Redox dashboard.
- From the navigation menu, click the Monitoring page.


- By default, the Alert rules tab opens with any configured alert rules and their latest status (statuses won’t display if there aren’t any subscription links). If linked to multiple subscriptions, the status is a global one.
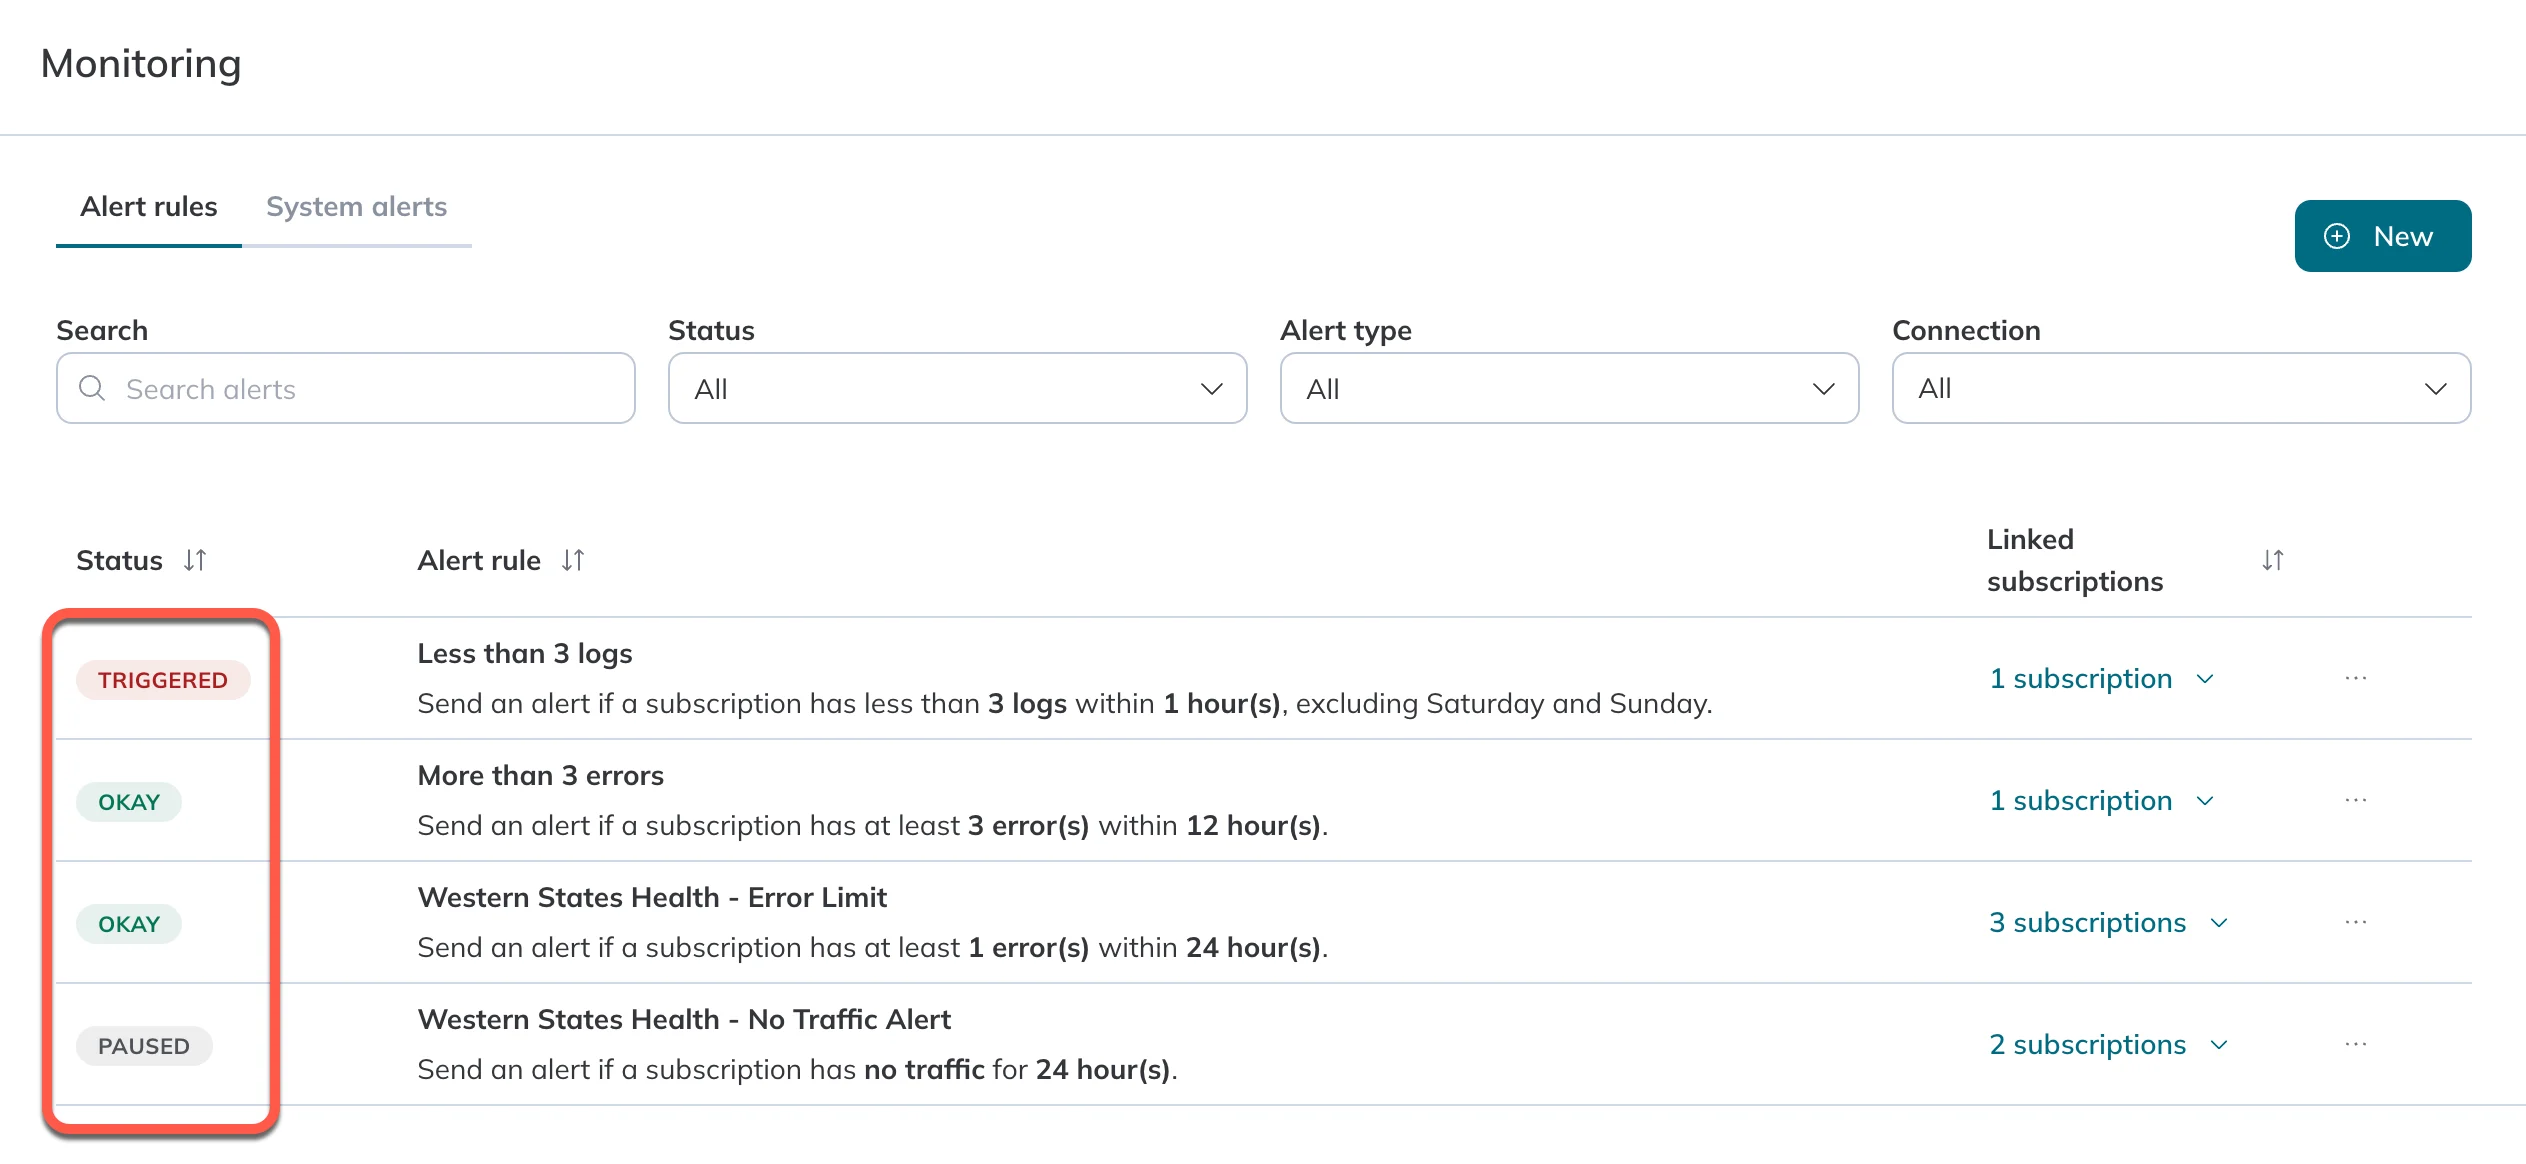
Global statuses of linked alert rules Available environment types and connections - Search for or use the filters to narrow down the list of displayed alert rules.
- Click the subscription links to expand the alert rule to see each individual subscription links and status.
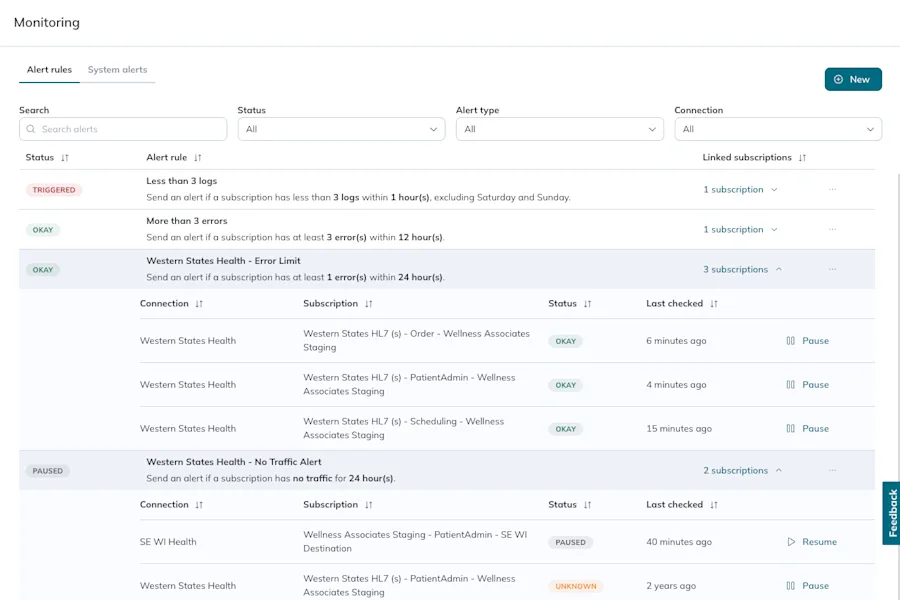
Expanded details of alert rules Alert statuses - To review a specific alert rule, click anywhere its row to open the Details page.
- Follow the steps to view alert rules.
- Click the New button.

- The create form opens. Under Alert settings, fill out the details:
- Name: Enter a human-friendly name for the alert rule. This name displays on the Alert rules tab, so choose a descriptive enough name to easily identify it.
- Type: Select one of the following:
- No traffic
- Low traffic
- Error threshold
- Retry thresholdMultiple alert rules for a subscription
- Within (only for No traffic, Low traffic, Error threshold): Select the time interval for the look-back window Redox should use when checking for the alert rule conditions. Retry threshold alerts uses a static look-back, so this field won’t appear.
- Number of logs or errors (only for Low traffic, Error threshold, Retry threshold): Use the up and down arrows to choose the allowable number of logs or errors before an alert rule is triggered.
Create an alert rule - (Optional) Skip notifications on: Select any days of the week or holidays you don’t want to receive notifications for triggered alert rules.Monitoring doesn’t stop on skipped daysMulti-region holiday lists
- Select a time zone for the skipped days.Default time zone for different subscriptions
- Under Notifications, enter the email address(es) that should receive a notification when the conditions of the alert rule are met. Use commas to separate email addresses if the alert notification should go to more than one address.
- Click the Create button.
- A modal opens with a reminder to link the alert rule to activate it. Click the Confirm button.
Configure notification settings - The Details page opens. To start monitoring rule conditions, link an alert rule to one or more subscriptions.
- Follow the steps to view alert rules.
- Find the alert rule you want to edit and click anywhere in its row.
- The Details page opens. Click the Edit button.
- The edit form opens. Edit the alert rule name, type, time intervals, skip notifications, or notification email addresses.
- Once you’re finished, click the Save button.

Edit an alert rule
- Follow the steps to view alert rules.
- Find the alert rule you want to delete. Click the three-dots icon, then the Delete option. Deleting an alert rule also deletes any associated subscription links. Alternatively, click anywhere in its row to open the Details page to review any details prior to deleting. Click the Delete button.Deleting alert rule vs. deleting links
- A confirmation modal appears. Click the Delete button to continue.

Delete an alert rule
Once you’ve created an alert rule, you must link it to one or more subscriptions to begin monitoring for the rule’s conditions.
- Follow the steps to view alert rules.
- Find the alert rule you want to link and click anywhere in its row.
- The Details page opens. Under the Alert rule links section, select the relevant connection from the drop-down menu.
- Click the Select subscription link.
- A modal opens with the available subscriptions for the connection you selected. Use the Search field or the Connection drop-down to narrow down the available options. If needed, use the page options at the bottom of the modal to navigate through the pages. Then select the radio button of the subscription you want to link an alert rule to.
- Click the Select button.
- Click the Link rule button to finish linking the alert rule to the subscription.

Link an alert rule - The new link appears in the table. Redox begins evaluating for the alert rule conditions every 15 minutes (Error threshold or Retry threshold alert rules) or every 30 minutes (No traffic or Low traffic alert rules).
- Repeat these steps to link the alert rule to as many other subscriptions as needed.
- When the alert rule conditions are met, we send a notification to the specified list of email addresses. The notification includes the information and related links for the triggered alert rule.Redox email addressThe specified users also receive a notification when the triggered condition resolves.
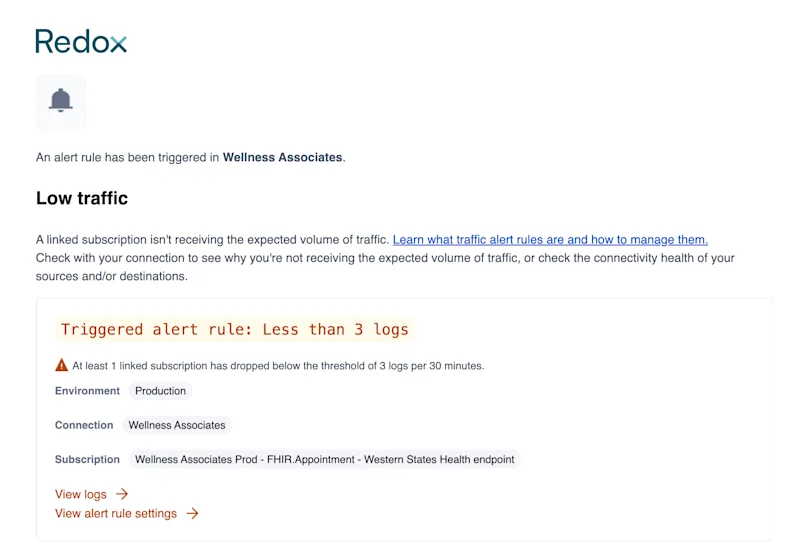
Triggered alert email notification 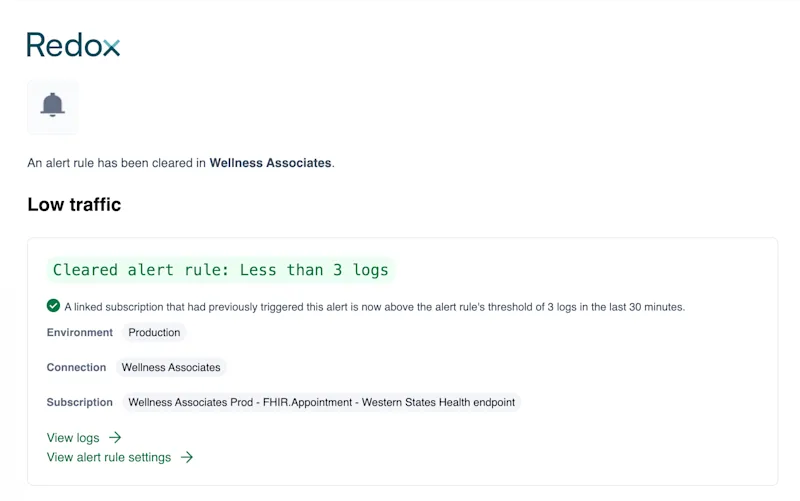
Cleared alert email notification
Pausing a link temporarily halts subscription monitoring. The alert rule is still linked to the subscription, but Redox won’t watch for any of the specified conditions. Pausing only affects monitoring, not actual subscription traffic.
- Follow the steps to view alert rules.
- Find the alert rule with the link you want to modify. Click the subscription links to expand it.
- Click the Pause button next to the subscription link.

Option 1: Pause an alert rule link - Alternatively, you can click in the alert rule row to open the Details page. Under the Alert rule links section, you can pause subscription links.

Option 2: Pause an alert rule link - To resume monitoring in either location, click the Resume button.
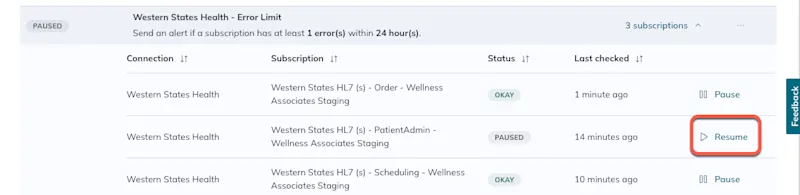
Resume monitoring a subscription link
Deleting a link removes the subscription from the alert rule, meaning the subscription won’t be monitored anymore. Deleting the link doesn’t delete the alert rule itself, though.
- Follow the steps to view alert rules.
- Find the alert rule with the link you want to delete and click anywhere in its row.
- Under the Alert rule links section, click the three-dots icon, then the Delete option next to the relevant subscription link.
- A confirmation modal opens. Click the Delete button to confirm and successfully delete the alert rule link.
Delete an alert rule link
